Sunday, May 5, 2013

A Whale of an Update.

So I thought it'd be fun to put all the pictures of the Whale together into one picture, so that the progression made can really be seen.
Does this remind you of the story of Jonas yet.... ?
Remember this is about 3 feet wide by 2 feet tall.  I have soooooo much beading that still needs to be done.  The last photo was taken this morning, I'm pretty proud of it so far.  I started work on this piece on November 13, 2011.  It's been almost a year and a half since I started this project.  Of course there's been like month long periods where this sat in the corner while I worked on other pieces, but who's counting?  I really want this finished for the exhibition deadline but I'm starting to think I will not make it.  After this one, I have another 8 more canvases stretched and ready to go.  Each new canvas is about a fourth of the size of this current piece. After the beading on the whale is done, then I have to go back into the background and finish covering the space with buttons.  Then I need to go back into the background and fill in the white spaces with beads until there's no background showing in between the buttons.  There's so much work to be done, and each time I sit down to work on this, I put on a movie.  I can now recite most of the lines from X-Men First Class, Robin Hood Men in Tights, The Avengers, Ghostbusters 1 and 2, and I'm slowly learning the lines to The Hobbit.  I will never leave my house again at this rate.

See Ya'll Later
~Amy 

Monday, April 22, 2013

What does a Whale, a Top Hat and a Dwarf have in Common?

Nothing.  Absolutely Nothing.

O man guys the Whale has been worked on.  There's a competition I want to enter work into, but I need to have the piece finished.
Not the best picture but it works.  I've put everything else on hold in order to finish this.  in the meantime there's been other projects.  I made a cardboard and paper mache top hat. 

It looks ridiculous.  I made it with the intent of wearing it, and felt too self conscious to walk around with it on my head.  And then there's this: 
This hangs on my wall and holds my convention badges.  I used an AC Moore wooden plaque which I painted and fastened the antler and cabinet knob to it.  These little projects keep me busy when I need a break from larger projects.  
If I weren't so busy with my full time job and working on the whale, I'd make a few more tutorials. 
Guys I've got over 1000 views.  I'm really glad that people seem to like the Horns tutorial.  Especially Germany.  You Germans rock.  So because people rock, here's a Tiny Pocket Ori animation via Tumbler.  I didn't think it was possible to make the Dwarves from The Hobbit adorable, but Tumbler you have proven me wrong.  Bask in the cuteness!  Bask I say!!

See Ya'll Later
Amy

Tuesday, February 19, 2013

A Much Needed Update

It's been far too long since I've made a post.  This new job takes up most of my time.... cause you know, it's a full time job.  I hate the job, but it pays pretty nice like. 

So I hate snow.  that snow storm Nemo we had:  Can.  Not.  Deal.  Snow is one of the many reasons I:
a) want to live in an apartment, and
b) want to live in southern California.
Snow's great when you're a kid, but once you have to dig out your car to get to work at 6am it's no longer fun.
There's been progress on the whale.  I'm now at a point where I have to change colors and meet the two colors to blend them.  I don't want a harsh separation between the tones, from medium to dark, it needs to have a nice smooth transition.  These transitions drive me nuts, I did this with the buttons for the background and it took me hours just to pick and choose the right colors and tones and even then I am limited by the supplies themselves.  I started work on a new pair of horns, this time a set of rams horns.  Those were a bitch to flat pattern because they spiral up and out.  I got the left horn structure completed, now I just need to finish the right one.
Wicked fair was this past weekend!!  Woot!  I made a paper mache and cardboard top hat... and then didn't bother to wear it.  It was kinda silly looking and it didn't fit well.  It was very last minute and I'm not broken up over it.  Lets face it though, it's cheaper than buying a nice one and I get to paint it in whatever colors I want.  Marina had her kimono panel which, despite the small attendance, was super fun.  Except for the shoes.  Oh my god those shoes were pretty but so very painful.  So this happened:
Photo taken by Kassandra Leigh <3
 I love the photo taken of us in Marina's kimono.  The photographer is Kassandra Leigh, she's this little pixie of a girl who shows up in a Latex mini dress with a short fur cape and knee high socks.  She's drop dead gorgeous.  It was like 29 degrees F outside and windy as fuck while she's taking photos and I'm just trying to keep the kimono closed (I'm on the left).  We were on this wooden pier thing that went out into the pond outside the hotel, and Marina hops up onto the railing and we are praying she doesn't loose her balance and fall into the freezing cold pond.  Apparently there were people watching us through the windows of the hotel and were hoping she didn't fall into the water too.  As we were walking back to the room, we were walking single file and kinda shuffling,
 and it reminded me of the Mikado by Gillbert and Sullivan.   
Yeah, kinda like that but without the outdated gender and cultural stereotypes.  I was singing this in my head the whole time!  I think this, and the swap meet on Sunday were the highlights of my weekend.  Other than that I felt mostly bored at Wicked fair.  It was difficult to navigate and there was no map.  The vendors were all over the place, there was no Dungeon set-up this year, I missed all of the performances cause I either didn't know where they were or missed the time slot.  
So I swear photos will get posted of art eventually, but the cord and the battery charger for my camera have disappeared.  Again.  Once those are found I have a whole lot of photos to upload.
That's it for now.
See Ya'll Later!
~Amy

PS-->  OH MY GOD GUYS 900 VIEWS!!  So freaking sweet! Everyone Rocks!!

Wednesday, December 5, 2012

Tutorial: How to make a Clown Fish Christmas Ornament using Cardboard.

Tutorial Time!!
I've been meaning to make some gifts for my Christmas celebrating friends, and this year, I thought it would be nice to make ornaments.  I decided to go with a theme that everyone can get behind, so I picked fish.  Who doesn't love a cute clown fish like Nemo?  This is an especially nice gift for friends with kids who want to make an assortment of under-sea creatures that are kid friendly and cheap to make.  The basic concepts for the construction is the same as the Cardboard Horns I posted about back in the summer.

You will need:
One empty corrugated cardboard box
One empty tissue box or non-corrugated cardboard box of equal weight
One bottle of Elmers white glue (or any school-kid, clear drying glue that's not a gel or stick)
Crappy paint brushes
Brown craft paper or grocery paper bags (there's a reason for this, I'll get to it later)
Hot glue and hot glue gun
Strong scissors
Plastic bowl (for water)
Rags
Acrylic Gesso (primer)
Acrylic paints
Nicer set of paint brushes
Acrylic varnish (glossy)
An exacto knife
A cutting mat or cutting surface

You'll need materials first:
Corrugated Cardboard
I raided my recycling bin and grabbed a clean corrugated cardboard box, then split open the box so that it lies flat in one big piece.  I also grabbed an empty tissue box and also cut it open to be one big piece.  This fish should fit in the palm of your hand so you're not going to need the entire box for this.
Tissue Box
Pick a subject:
  I chose a clown fish cause it's small and relatively easy to cut out it's shape from cardboard, plus it's just so cute.  I was going to make an Angler fish, but figured if I want to give this to someone, a Clown fish would be less nightmare inducing.  I google image searched for a clown fish and began by drawing the basic shape of the clown fish body.  In this basic drawing, include the top two fins, the tail fin and the back bottom fin.  Don't cut out the two little bottom fins at the front of the fish or the side fins on the body just yet.  We're gonna leave those for later.  Once you've drawn out the basic fish shape, cut it out from the cardboard.
Draw the basic shape
 Important Note~ Make sure the fish is perpendicular to the grooves of the cardboard.  This means the grooves should be straight up and down and the fish should be horizontal across the grooves.   

Start giving a 3-D shape to the fish:
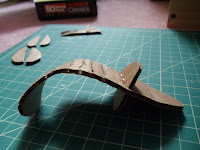
It's only mostly dead.
 I wanted the fish to have a curve to it, to give it the appearance that it's swimming and not just hanging in space with a static/boring body position.   Here's where the orientation of the fish in relation to the cardboard grooves becomes relevant.  To make the exact shape that I made, start slicing with an exacto knife though the top layer of the cardboard on one side of the fish, going from the tail fin up to where the tail meets the body.  Curl it.  Once you find the arc you like, take your hot glue gun, and fill the open channels with hot glue.  Take another piece of cardboard and while the glue is still hot, carefully smooth it down so there's no lumpy hot glue clumps in the channels.  You should end up with a relatively smooth surface.  This will keep the arc from straightening out, making a permanent curl in which-ever direction you like. 
Study pictures of the species of fish you want to make.  Unlike the Horns, to make the structure of the body of the fish you can't use exact circles because that's not how a fish really looks.  Find frontal and body views of the fish and study the shape of the body.  For the clown fish, it's bigger and rounder at the bottom of it's body and it tapers off into the fins at the top.  I marked off vertical lines (following the grooves) where I wanted support pieces to go for the body of the fish and measured them.  I drew up tear-drop shapes that were the height of the fish's body for each one of the lines. 
Brings a tear to my eye...
Cut the tear-drops in half from tip to base.  Gradate the sizes (small in the front, big in the middle and small in the back) of teardrop shapes to match the body shape of the fish.  Remember (for the clown fish) the middle is where most of the internal organs are and the back has to taper out into a flat fin (this step can change depending on what species you are basing this on ie: a whale is a completely different shape than a clown fish). 
Using the hot glue gun, hot glue the half tear-drop shapes to the body following your lines.  make sure that you have lines on both sides of the body and that when you glue the pieces down, they line up right.  Make sure you have enough supports to get a nice smooth transition from one end of the fish to the other.
I did not have enough supports T-T
The tissue box:
  Cut a section of tissue box away from the rest and lay it flat on your cutting mat.  I used this cardboard to cover the structure supports from above and give it a more even surface for the future steps. 
Slice it good
 Also, due to the small size of the fish, using corrugated cardboard for this step would be too big and bulky.  From this larger piece, cut smaller rectangular pieces that can fit in your hand.  Here's where it gets fun.... lightly score the cardboard and start fitting and cutting sections to glue down, do this in small sections to account for size changes and irregular shapes. 
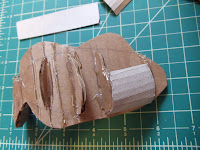
Should start to look like this when  you start...
 This is going to be a lot of guess and check work and you may throw away pieces that don't fit.  Work intuitively.  That's really the best advice I can give sorry guys.
... and when you finish.
Paper Mache:  
Sorry guys no photo of this step.  
Take you're brown paper bag (the grocery bag) or brown craft paper and start tearing it into pieces about 1 inch square.  Do Not Cut!!  You must tear the paper.  Tearing the paper allows for the paper fibers to be exposed and this will help blend your pieces together for a smoother finish.  When you cut with scissors, the harsh edges don't blend together and you'll end up with ridges in awkward places that are hard to get rid of later.  Once you have these pieces torn, take a few and tear them up further so that they fit on the pad of your pinky finger.  I did this because the scale of the fish is so small, that to get the paper to lie flat over the curves, the pieces need to be smaller.  It'll take a little longer to finish but the smoother texture to the fish will be well worth the patience.  After your pieces are prepped, get a crappy brush, a scrap piece of cardboard and the Elmers glue.  Pour some glue on the scrap card board, and with a crappy paint brush start painting patches of glue onto the fish.  After laying down the glue, pick up a piece of your torn craft paper and place it down on the patch of glue, use the paint brush to give a coating of glue making sure to get all the edges down.  Repeat this until the entire fish is covered in one layer of paper mache.  Let this dry completely before moving on. 

Fins:
Grab a piece of the tissue box and sketch out a pair of side fins and a pair of the bottom fins.  Using the above process give one layer of paper mache to both sides of the fins.  When they are dry, hot glue them into place according to how the fish looks.  If you want fins that have folds or bends, score the cardboard appropriately and give a little bit of hot glue to keep the curves in place.  Always reference back to your original images for placement!!  Your fish shouldn't look like a Picasso!  After you glue down the fins to the body of the fish, give them another coating of paper mache and the surrounding area where the fins are joined to the body.  Allow this to dry. 
 At this point you can smooth out any lumps and bumps using wads of paper mache, apoxie or paper clay (you can pick that stuff up in most craft/ art supply stores).  If you feel it's still not sturdy enough you can add more layers of paper mache, I only used 1 layer on the body and 2 layers on the fins and I found that to be fairly sturdy... just don't stand on it.
Allow this to dry completely.

Painting:
Use a clean crappy brush and apply gesso to the whole fish. 
gesso...
This acts as a primer and allows for really bright colors by giving you a white background to start with.  Skip this part if you want the brown of the paper to tone your colors, this will give you more earthy tones. 
After gesso, I gave an red-iron-oxide base
After this step, start mixing colors (use a nicer brush like a pointed round tip to paint and a palette knife for mixing) and paint your fish whatever colors you wish.  I chose to go with a more realistic approach but if electric blue with pink polka dots is your thing then have fun!
After you're done painting, give a few layers of glossy varnish to keep the colors safe from chipping and to give a wet-shiny look.
To make this an ornament add a ribbon and tie a bow at the top. 

Always remember to clean and dry your brushes after using them and clean your space after you're done working. 
... and you're done!  Your fish should look something like this: 
Like this!
And this!

So I hope you all found this helpful, and any questions leave a comment. 
Happy Holidays!!

See ya'll later!!
~Amy

Sunday, November 18, 2012

More Geek Knitting

Well in spite of my best efforts I could not find a whole lot of Avengers knitting charts.  So I made two of my own.  I was also inspired to knit a sweater for my friend Habeas Corpsemaker.  She's a roller derby girl with a passion for comics, and she was hit by a car a few days ago.  Her ankle is pretty mangled up and she's not skating let alone walking for a while.  So to cheer her up, I thought I'd knit her a sweater, but not just any sweater, an Iron Man sweater.  So I started looking for a chart.... and there are none.  Or at least none I'm happy with. 
He's just so happy!
Must've found the booze.
Well after turning up nothing, I drafted my own pattern.  I'm pretty happy with it and on a black background it should look pretty kick ass.  I wish I had a better picture with the text at the bottom, but I made this using Excel.  I added a quote from the 3rd movie trailer, "Nothing's been the same since New York..."  This is gonna be an epic sweater, and she better wear it to the movie opening.  I plan on adjusting the colors so it's more deep red and gold and metallic looking.   
Now I like Iron Man just as much as the next girl, but Loki shall always have my heart.  Let's face it ladies, he's a sexy man beastie.  So for all the Hiddleston Fans, I made this:

I just quimed my pants :3
Very basic Loki Helmet Knitting Chart..... KNEEL BEFORE ME YOU SNIVELLING QUIMS!!!  I've gotten good at making the charts pretty quickly, especially when there's only one or two colors.  I happen to like the arc of the horns on the helmet in this pose, cause from a frontal view it's not that noticeable.
I'm always open to suggestions for characters to make charts of... and I can't wait to knit these into sweaters!!
See ya'll Later!

Tuesday, November 6, 2012

Stitch n' Geek

Recently I've really gotten into more complicated knitting.  I'm always looking for nerdy knitting charts and geeky patterns.  I knitted a baby sweater for my friend.  A BATMAN SWEATER!!  I need to get pictures of her kid in the sweater cause that kid could pass for a baby Bruce Wayne.  Well only if you follow Batman the Animated Series.  But the chart was really good and translated well into a knitted pattern.  I wish I had saved the link to the website I got it from, cause frankly I'm not that good with drafting charts, so the following image is not mine. 
nanananananananananana....
KNITTING
I love this chart!!  I can't wait to make myself a sweater with this chart!!!!
I'm trying my hand at drafting a Tardis chart and a Green Lantern.  Both are fairly simple designs and about 2 colors each so it just takes time to get the look right.  While searching the internet I came across an 8 bit version of Guy Fawkes which was pretty awesome and I'd love to make a sweater out of that and found what was labeled as the Stargate eye of Ra:
He's watching you sleep. 

Not too sure if it really is the Stargate Ra symbol or just a standard symbol for Ra, but it still looks cool.  Again I forgot to save a link to give credit to and again it's not my drawing. 
Found a Doctor Who chart here and I think it's cute, but it's not a standard Tardis.
Insert theme song here.
I saw an Ood chart that was 2 colors, but it was so abstract that it almost looked like a mess of squid tentacles more than an actual character.  There are plenty of Mario and Legend or Zelda Triforce charts, but I'm not much of a gamer.  I look more for Star Wars, Star Trek, Doctor Who, and DC/Marvel.  Of course I'm still on the hunt for awesome charts and when I finish off more projects I'll be making a wardrobe of Nerdy sweaters to wear for next, next winter.  

So that's all for now.
See Ya'll Later!
~Amy

Thursday, November 1, 2012

O god this storm. Why?!

Umm, I'm at my sister's apartment, cause she's got power.... and heat, internet, cable and hot showers.  My place was literally colder inside than outside and last night was about 37 degrees F.  I have no photos or tutorials today.  Sad face.  Also work has been impossible to get to due to downed trees/ tree limbs/ power lines, and they lost power too so they're closed.  So I'm out of work and have no heat.  Thank god for sisters with nice apartments. 
~Amy