Showing posts with label craft. Show all posts

Tuesday, September 30, 2014

It's Like Living In The Past

Well, it's been far too long since I've posted.  It's been super busy out here in Bumblefuck NJ.  Between the old timey crafting I've been doing and watching the wild turkeys from my kitchen there's been so much excitement.  Unfortunately sarcasm doesn't come through so well in type, so you'll have to add that in yourself.  So I'm soon to be an Auntie, which is very exciting!  Guys, I made a baby quilt for the chubby bundle of cuteness that shall be arriving very soon.  
I'm rather proud of it.  My first time making a quilt and it looks freaking awesome.  The border is probably the best accomplishment of the entire thing, it was exhausting to make the bias tape for it and a bitch to pin down.  You can't really see it but there's even a handle and strap to tie it up and take it anywhere.  Really this is going to be a play mat for the little tadpole to futz around on. 
Did I mention that I appliquéd BUTTERFLIES onto the back.  Oh yeah, I did a cute thing!  But wait, there's a close up,
BOOOM, cute little butterflies.  The backing fabric looks very blue but it's really like a teal aqua..... Damn you ipad photo crap.  
Now I'm super into making quilts, and when I say that I mean, "I want a warm blanket for the winter cause last year was brutal."  I've been working on saving and sewing my scrap fabrics together to make yardage and I managed to make enough yardage to make myself a rather large and cozy quilt.  So far I'm about 11 inches short on the width of the top fabric, and I'm over complicating the back side by making a Dia De Los Muertos themed backing.  
Don't judge!!
I don't have any updated photos of the top fabric but I'm working on the back side with roses, and sugar skulls.  I don't care if this will take forever, I want this to look good!  


There's been work done on the beaded Octopus, it has more than one tentacle now.  
There should be a Steve Irwin accent but, "ain't she a beauty?!"  This right here is my baby.  My pride and joy, my turning-into-a-year-long-piece-of-awesome.  Rather proud of it and it's so sparkly in sunlight.  It's sad to say but that's really it.  If I'm not at work I'm working on the arts 'n crafts.  
Well I have to continue sewing the backing for the quilt..... Why did I take on this project just shoot me now.  

Oh and I was not kidding about the wild turkeys. 
Whole damn family of them hanging in the back yard.  

Tuesday, February 19, 2013

A Much Needed Update

It's been far too long since I've made a post.  This new job takes up most of my time.... cause you know, it's a full time job.  I hate the job, but it pays pretty nice like. 

So I hate snow.  that snow storm Nemo we had:  Can.  Not.  Deal.  Snow is one of the many reasons I:
a) want to live in an apartment, and
b) want to live in southern California.
Snow's great when you're a kid, but once you have to dig out your car to get to work at 6am it's no longer fun.
There's been progress on the whale.  I'm now at a point where I have to change colors and meet the two colors to blend them.  I don't want a harsh separation between the tones, from medium to dark, it needs to have a nice smooth transition.  These transitions drive me nuts, I did this with the buttons for the background and it took me hours just to pick and choose the right colors and tones and even then I am limited by the supplies themselves.  I started work on a new pair of horns, this time a set of rams horns.  Those were a bitch to flat pattern because they spiral up and out.  I got the left horn structure completed, now I just need to finish the right one.
Wicked fair was this past weekend!!  Woot!  I made a paper mache and cardboard top hat... and then didn't bother to wear it.  It was kinda silly looking and it didn't fit well.  It was very last minute and I'm not broken up over it.  Lets face it though, it's cheaper than buying a nice one and I get to paint it in whatever colors I want.  Marina had her kimono panel which, despite the small attendance, was super fun.  Except for the shoes.  Oh my god those shoes were pretty but so very painful.  So this happened:
Photo taken by Kassandra Leigh <3
 I love the photo taken of us in Marina's kimono.  The photographer is Kassandra Leigh, she's this little pixie of a girl who shows up in a Latex mini dress with a short fur cape and knee high socks.  She's drop dead gorgeous.  It was like 29 degrees F outside and windy as fuck while she's taking photos and I'm just trying to keep the kimono closed (I'm on the left).  We were on this wooden pier thing that went out into the pond outside the hotel, and Marina hops up onto the railing and we are praying she doesn't loose her balance and fall into the freezing cold pond.  Apparently there were people watching us through the windows of the hotel and were hoping she didn't fall into the water too.  As we were walking back to the room, we were walking single file and kinda shuffling,
 and it reminded me of the Mikado by Gillbert and Sullivan.   
Yeah, kinda like that but without the outdated gender and cultural stereotypes.  I was singing this in my head the whole time!  I think this, and the swap meet on Sunday were the highlights of my weekend.  Other than that I felt mostly bored at Wicked fair.  It was difficult to navigate and there was no map.  The vendors were all over the place, there was no Dungeon set-up this year, I missed all of the performances cause I either didn't know where they were or missed the time slot.  
So I swear photos will get posted of art eventually, but the cord and the battery charger for my camera have disappeared.  Again.  Once those are found I have a whole lot of photos to upload.
That's it for now.
See Ya'll Later!
~Amy

PS-->  OH MY GOD GUYS 900 VIEWS!!  So freaking sweet! Everyone Rocks!!

Wednesday, December 5, 2012

Tutorial: How to make a Clown Fish Christmas Ornament using Cardboard.

Tutorial Time!!
I've been meaning to make some gifts for my Christmas celebrating friends, and this year, I thought it would be nice to make ornaments.  I decided to go with a theme that everyone can get behind, so I picked fish.  Who doesn't love a cute clown fish like Nemo?  This is an especially nice gift for friends with kids who want to make an assortment of under-sea creatures that are kid friendly and cheap to make.  The basic concepts for the construction is the same as the Cardboard Horns I posted about back in the summer.

You will need:
One empty corrugated cardboard box
One empty tissue box or non-corrugated cardboard box of equal weight
One bottle of Elmers white glue (or any school-kid, clear drying glue that's not a gel or stick)
Crappy paint brushes
Brown craft paper or grocery paper bags (there's a reason for this, I'll get to it later)
Hot glue and hot glue gun
Strong scissors
Plastic bowl (for water)
Rags
Acrylic Gesso (primer)
Acrylic paints
Nicer set of paint brushes
Acrylic varnish (glossy)
An exacto knife
A cutting mat or cutting surface

You'll need materials first:
Corrugated Cardboard
I raided my recycling bin and grabbed a clean corrugated cardboard box, then split open the box so that it lies flat in one big piece.  I also grabbed an empty tissue box and also cut it open to be one big piece.  This fish should fit in the palm of your hand so you're not going to need the entire box for this.
Tissue Box
Pick a subject:
  I chose a clown fish cause it's small and relatively easy to cut out it's shape from cardboard, plus it's just so cute.  I was going to make an Angler fish, but figured if I want to give this to someone, a Clown fish would be less nightmare inducing.  I google image searched for a clown fish and began by drawing the basic shape of the clown fish body.  In this basic drawing, include the top two fins, the tail fin and the back bottom fin.  Don't cut out the two little bottom fins at the front of the fish or the side fins on the body just yet.  We're gonna leave those for later.  Once you've drawn out the basic fish shape, cut it out from the cardboard.
Draw the basic shape
 Important Note~ Make sure the fish is perpendicular to the grooves of the cardboard.  This means the grooves should be straight up and down and the fish should be horizontal across the grooves.   

Start giving a 3-D shape to the fish:
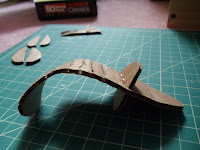
It's only mostly dead.
 I wanted the fish to have a curve to it, to give it the appearance that it's swimming and not just hanging in space with a static/boring body position.   Here's where the orientation of the fish in relation to the cardboard grooves becomes relevant.  To make the exact shape that I made, start slicing with an exacto knife though the top layer of the cardboard on one side of the fish, going from the tail fin up to where the tail meets the body.  Curl it.  Once you find the arc you like, take your hot glue gun, and fill the open channels with hot glue.  Take another piece of cardboard and while the glue is still hot, carefully smooth it down so there's no lumpy hot glue clumps in the channels.  You should end up with a relatively smooth surface.  This will keep the arc from straightening out, making a permanent curl in which-ever direction you like. 
Study pictures of the species of fish you want to make.  Unlike the Horns, to make the structure of the body of the fish you can't use exact circles because that's not how a fish really looks.  Find frontal and body views of the fish and study the shape of the body.  For the clown fish, it's bigger and rounder at the bottom of it's body and it tapers off into the fins at the top.  I marked off vertical lines (following the grooves) where I wanted support pieces to go for the body of the fish and measured them.  I drew up tear-drop shapes that were the height of the fish's body for each one of the lines. 
Brings a tear to my eye...
Cut the tear-drops in half from tip to base.  Gradate the sizes (small in the front, big in the middle and small in the back) of teardrop shapes to match the body shape of the fish.  Remember (for the clown fish) the middle is where most of the internal organs are and the back has to taper out into a flat fin (this step can change depending on what species you are basing this on ie: a whale is a completely different shape than a clown fish). 
Using the hot glue gun, hot glue the half tear-drop shapes to the body following your lines.  make sure that you have lines on both sides of the body and that when you glue the pieces down, they line up right.  Make sure you have enough supports to get a nice smooth transition from one end of the fish to the other.
I did not have enough supports T-T
The tissue box:
  Cut a section of tissue box away from the rest and lay it flat on your cutting mat.  I used this cardboard to cover the structure supports from above and give it a more even surface for the future steps. 
Slice it good
 Also, due to the small size of the fish, using corrugated cardboard for this step would be too big and bulky.  From this larger piece, cut smaller rectangular pieces that can fit in your hand.  Here's where it gets fun.... lightly score the cardboard and start fitting and cutting sections to glue down, do this in small sections to account for size changes and irregular shapes. 
Should start to look like this when  you start...
 This is going to be a lot of guess and check work and you may throw away pieces that don't fit.  Work intuitively.  That's really the best advice I can give sorry guys.
... and when you finish.
Paper Mache:  
Sorry guys no photo of this step.  
Take you're brown paper bag (the grocery bag) or brown craft paper and start tearing it into pieces about 1 inch square.  Do Not Cut!!  You must tear the paper.  Tearing the paper allows for the paper fibers to be exposed and this will help blend your pieces together for a smoother finish.  When you cut with scissors, the harsh edges don't blend together and you'll end up with ridges in awkward places that are hard to get rid of later.  Once you have these pieces torn, take a few and tear them up further so that they fit on the pad of your pinky finger.  I did this because the scale of the fish is so small, that to get the paper to lie flat over the curves, the pieces need to be smaller.  It'll take a little longer to finish but the smoother texture to the fish will be well worth the patience.  After your pieces are prepped, get a crappy brush, a scrap piece of cardboard and the Elmers glue.  Pour some glue on the scrap card board, and with a crappy paint brush start painting patches of glue onto the fish.  After laying down the glue, pick up a piece of your torn craft paper and place it down on the patch of glue, use the paint brush to give a coating of glue making sure to get all the edges down.  Repeat this until the entire fish is covered in one layer of paper mache.  Let this dry completely before moving on. 

Fins:
Grab a piece of the tissue box and sketch out a pair of side fins and a pair of the bottom fins.  Using the above process give one layer of paper mache to both sides of the fins.  When they are dry, hot glue them into place according to how the fish looks.  If you want fins that have folds or bends, score the cardboard appropriately and give a little bit of hot glue to keep the curves in place.  Always reference back to your original images for placement!!  Your fish shouldn't look like a Picasso!  After you glue down the fins to the body of the fish, give them another coating of paper mache and the surrounding area where the fins are joined to the body.  Allow this to dry. 
 At this point you can smooth out any lumps and bumps using wads of paper mache, apoxie or paper clay (you can pick that stuff up in most craft/ art supply stores).  If you feel it's still not sturdy enough you can add more layers of paper mache, I only used 1 layer on the body and 2 layers on the fins and I found that to be fairly sturdy... just don't stand on it.
Allow this to dry completely.

Painting:
Use a clean crappy brush and apply gesso to the whole fish. 
gesso...
This acts as a primer and allows for really bright colors by giving you a white background to start with.  Skip this part if you want the brown of the paper to tone your colors, this will give you more earthy tones. 
After gesso, I gave an red-iron-oxide base
After this step, start mixing colors (use a nicer brush like a pointed round tip to paint and a palette knife for mixing) and paint your fish whatever colors you wish.  I chose to go with a more realistic approach but if electric blue with pink polka dots is your thing then have fun!
After you're done painting, give a few layers of glossy varnish to keep the colors safe from chipping and to give a wet-shiny look.
To make this an ornament add a ribbon and tie a bow at the top. 

Always remember to clean and dry your brushes after using them and clean your space after you're done working. 
... and you're done!  Your fish should look something like this: 
Like this!
And this!

So I hope you all found this helpful, and any questions leave a comment. 
Happy Holidays!!

See ya'll later!!
~Amy

Sunday, November 18, 2012

More Geek Knitting

Well in spite of my best efforts I could not find a whole lot of Avengers knitting charts.  So I made two of my own.  I was also inspired to knit a sweater for my friend Habeas Corpsemaker.  She's a roller derby girl with a passion for comics, and she was hit by a car a few days ago.  Her ankle is pretty mangled up and she's not skating let alone walking for a while.  So to cheer her up, I thought I'd knit her a sweater, but not just any sweater, an Iron Man sweater.  So I started looking for a chart.... and there are none.  Or at least none I'm happy with. 
He's just so happy!
Must've found the booze.
Well after turning up nothing, I drafted my own pattern.  I'm pretty happy with it and on a black background it should look pretty kick ass.  I wish I had a better picture with the text at the bottom, but I made this using Excel.  I added a quote from the 3rd movie trailer, "Nothing's been the same since New York..."  This is gonna be an epic sweater, and she better wear it to the movie opening.  I plan on adjusting the colors so it's more deep red and gold and metallic looking.   
Now I like Iron Man just as much as the next girl, but Loki shall always have my heart.  Let's face it ladies, he's a sexy man beastie.  So for all the Hiddleston Fans, I made this:

I just quimed my pants :3
Very basic Loki Helmet Knitting Chart..... KNEEL BEFORE ME YOU SNIVELLING QUIMS!!!  I've gotten good at making the charts pretty quickly, especially when there's only one or two colors.  I happen to like the arc of the horns on the helmet in this pose, cause from a frontal view it's not that noticeable.
I'm always open to suggestions for characters to make charts of... and I can't wait to knit these into sweaters!!
See ya'll Later!

Monday, October 29, 2012

Happy... eh... Halloween....

Happy Halloween to those of you not hunkering down for Hurricane Sandy.  The whole state of NJ is on "State of Emergency" status so I'm indoors for today and tomorrow.  Work was cancelled as well.  I am incredibly happy on that note.  The wind literally just picked up like 2 seconds ago.  It hasn't really been raining heavily, but the wind's been going since last night.  Now we are getting heavier gusts.  0.o I really hope the tree in the front of the house doesn't fall, it is rather large and old.  PS. I'm trying to get this post done before the power/internet goes out from downed branches and such. 
Store display somewhere in Soho
On a happier note, Marina and I went into NYC on Saturday night.  We wandered around Soho for a few hours, got chocolate (yum!), I picked up a salt scrub and Marina got shoes.  We were very girly, even when we had pizza and watched The Avengers movie later in the night.  We oggled Captain America's bum.... it is quite heroic ;D.

We had plans to go to a steampunk gathering in costume, but we decided against it in favor of Steve Roger's bum and Loki's sexy voice.  I didn't have a costume, but I made a nice mask.  Unfortunately I did not take in-progress pictures T-T , next time I will and I'll give a tutorial.   
I tried for a Day of the Dead look
 The Mask is made of paper mache, I used a mixture of like 1:1 Elmer's white glue/water and used brown craft paper.  A little trick I learned is that a) craft paper makes for stronger paper mache, and b) tear instead of cut the paper to get frayed and fibrous edges.  Those edges help to blend the paper pieces together and create a smoother surface.  When you cut the paper with scissors/exacto knives the straight and sharp edge doesn't blend smoothly within the other pieces of paper and creates ridges that are really difficult to get rid of.  I used a Styrofoam head I picked up at a goodwill store a few years ago as a form to work on top of.  This did not give me a perfect fit at places like the bridge of my nose and forehead depth, but for a first time try, I think I'll let that slide.  
Painting was kind of a bitch.
Painting this sucker was really difficult.  I couldn't keep my hand steady for the red pin stripes and had to paint over and redo a few.  For the stripes I used a brush called a rigger brush.  It's a very thin and fine haired watercolor brush that has unusually long bristles.  Rigger brushes are mainly used for painting long unbroken lines.  To keep the lines from looking blob-like, I added some water to the paint to thin it down for easier application. After that a basic pointed round tip brush was used for pretty much everything else, and after getting some coffee in me, my hand was a lot more controlled.
detail shot
Like I said earlier, I'll make a more in-depth post later on about the paper mache process and I'll take more photos to make a tutorial for ya'll.  I'm thinking of making a cardboard base for the next one and adding horns to make a demon or animal mask..... >:3
That's all for now, the wind is picking up more and it's really raining now so I'm gonna get off my computer and wait out the storm.
See Ya'll Later!
~Amy

Sunday, October 14, 2012

To Quilt Or Not To Quilt...

The largest piece
So to get my mind off of the incredibly difficult knitting mess I've gotten myself into, I've decided to work on some sewing projects.  I think I went over some theories behind the weaving projects I've got going, the ideas of taking 'nothing' scraps of yarn and fabric and making cloth or sculpture from them.
 Same concept applies to most of my sewing.  I have this huge box of scraps that I've been slowly sewing up.  I started what's called improvisational sewing, but there were too many irregular angles to work with so I started trimming as little off of the fabric as possible to make squares and rectangles. 
 I really don't have any patience on this project, there's too much material and not enough time for me to be picky.  So far I've managed about a solid yard and I'm still adding to it.  
Smaller pieces
I'm looking through these boxes of scrap and I'm like "damn I have a lot of stuff."  I really don't realize just how much stuff I have.  It's starting to scare me, like, I think one day I may end up on one of those Hoarders shows.  First world problems, I know right?  If you couldn't tell that last sentence was sarcasm.  I'm going to go through my fabric again and find lengths to donate or just toss since it's a little gross.  I've got a good portion of fabric that smells like smoke, which is never a good thing.  At that point there's no saving them, if they smell like smoke even after several washes, I feel no remorse in tossing them cause that smoke smell will never come out.  
I mentioned in teh previous post that I had finished a project.  Here are some photos.
Bowl Me Over :3
I coiled lots of knitted cord over a form and then sat on the couch watching Pitbulls and Parolees and Walking Dead while hand stitching the entire piece.  
Side view
I had wanted to make the lip of the bowl curl over and down and across a surface, but now I'm like, "screw that"  I'd never finish the project if I continued it
Top view
 At some point I will use shellac or resin to coat it so it becomes like a sculptural object.  Not just art, but a functional piece so it can look awesome and hold fruit or something. 

As many of you have read in previous posts I applied to Anthropologie for a visual position.  I didn't get the job.  Even though my skills are 'impressive' they found someone who 'meets their needs more'.  I'm like "yeah, yeah fuck you too." in my head.  I think it really hard.  In their general direction.  I hope one day they spontaneously develop psychic powers so they can hear this.  Nicest mean letter I think I've ever gotten.  You know, I don't know why I continue to apply to this company.  I applied to Free People Clothing, Urban Outfitters and Anthropologie, and all of them have said something about me not 'fitting the brand'.  I think that's code for something nasty like 'you're too large to fit our clothing g.t.f.o.'  Seriously it wouldn't surprise me, because people suck. 

I applied to some jobs in the City.  I really hope I get one cause it's full time work at a gallery.  Guys wish me luck.  I really need to get out of retail and get a full time job. 

I think that's all I've got to say for now.  Thanks for listening ya'll.
~Amy

Tuesday, October 9, 2012

Nailed It

Redesigned the blog!  Hope you all like it <3

Monday September 24th

Well it's official, I'm obsessed with painting my nails.  This is kind of a new novelty for me.  Most of the time I smack my hand against something and the nail chips or from my nervous habit, I'll pick at the nail until that little white part comes off so they're too small to paint.  I went to a wedding this weekend, and I was determined to have long-ish nails to paint by then.  I did.  I've also discovered the awesome that is crackle polish.  My theory is, that the more interesting my nails are, the more careful I will be with them, allowing them to grow longer.  While up in Massachusetts for the wedding, I annoyed my friend to no end with wondering how crackle polish works, she got so fed-up that she looked it up on her phone, shoved it at me and said, "Here, read this and shut up."  Well, she said something along those lines. 

So the wedding.  A good friend of mine from high school got married to her long time boyfriend.  I wish I had the forethought to have taken pictures (I left my camera in my suitcase ::face palm::).  It was a beautiful ceremony, outdoors on a little farm-like area, a low stone wall and a gazebo with plants, and dragonflies everywhere.  For anyone who doesn't know me I'm terrified of insects.  Legit.  I'm not kidding you, I cried so hard walking through butterfly cages as a kid at zoos.  Things that crawl don't bother me as much as anything that can fly around my head and praying mantis.  Anyway, the bride looked amazing and I couldn't stop grinning like a loon, I was so happy for them and to see her really happy (especially after all the drama that comes with planning a wedding) was amazing.  The reception was great too, there were lots of cute roller derby guys there.  I'm still kicking myself for having not talked to at least one of them, but I'm anti-social like that. 

I've been involved with this battle of wills between my room and myself.  I really need to clean the space, but it's exhausting just looking at it.  Since I don't seem to be getting a call from the temp. agency today (it's like 10:40 am now), maybe I'll gear-up and jump back into the battle.  And when I say 'gear-up' I mean turn on some music and dance around while I try to find some bookends. 

2:01 pm Monday October 8th.
It looks like this is gonna be a post where I'm gonna date it every time I wanna add something to say.   Keeps the number of posts down.  The Battle of the Abyss aka the never ending effort to clean my room has come to a temporary truce.  I never really grasped how much stuff I have.  I'm proud of myself though, I've got clothes, accessories and comics to give away or donate.  I have this little self-satisfied smile on my face right now.  There's been furniture moving and the never ending laundry as well just to make the past week extra special. 
On the plus side, I rented seasons 1 and 2 of Torchwood from my local library.  I really need to catch up on that.  I also found an amazing knitting book.  It's a comprehensive guide on how to design a knitted garment, from sketch to pattern to knitting.  Super excited about this!

Featuring my
lovely pink carpet
On top of the many projects that I have going, I found a decorative birdcage at a flea market.  I've been looking for a nicely shaped birdcage to make a lamp out of it.  So in an effort to use up a good amount of my glass bead collection, I'm wire wrapping beads into the spaces between the bars to make the lamp a little more awesome.  Getting the bottom off of the birdcage was not easy, it was welded into place.  I eventually resorted to using bull-nose wire cutters and was able to take out the solder points.  Ruined my nail polish doing that lol.  
Look at the Pretty!
Not sure if this is good news or not just yet, but I applied to Anthropologie in Princeton for a Visuals position.  I had an interview with them and I felt like I had left a good impression and with any luck I'll get the job.  I followed up on that and they said they are still conducting interviews but they'll have an answer at the end of this week.  Guys send me some good luck cause this job would be amazing if I get it! 
Now's probably a good time to take my measurements so I can start making a knit pattern.  It's been damn cold here yo. 

6:33 pm
So, I finished one of those projects from so-far-long-ago-that-I-forgot-I-started-it.  OMG shock and awe right?!  I have an I-Cord maker, that makes I-cord or knitted horse reign.  I found a little crank-it-out one that makes a 4 stitch tube in Jo Anns Fabrics.  It's an absolute godsend!!  I don't know how I could have done any work without it.  I took 12 balls of emerald green yarn, knitted it into cord, then pinned it to a dress form and hand stitched a project out of it in college.  Which I then promptly lost in the mess that is my room.  Well I found my little godsend machine and started making cord out of these balls of yarn that are a pain in the ass to knit with since they're so freaking thin.  Then I was stuck with all this cord, so I thought "Hey!  Why don't I coil this up and make some sculpture with it?"  Brilliant deduction right?  Well that turned out to be a several month set of projects and then the sketchbook with the drawings in them has disappeared into the Abyss (I'll reference my room as "the Abyss" from now on... less to type).  So about a week ago, I found the unfinished project and have now finished it.   I was working on making some bowls or planters or something, and I finally finished hand sewing it.  It needs some starch or shellac to harden the form so it retains it's shape, but that can wait.  The point is that I will not be hand sewing that bastard anymore.  In the meantime I've neglected the Whale yet again.  I'm really starting to dread working on that piece.  Every day I look at it and I'm like, "Oh God look at all that white empty space T-T  ." 

10:09 am Tuesday October 9th
My workspace

Well, I have a walking path through the Abyss.  Score one for me!  I've also been taking my measurements so I can start drafting a pattern to knit.  There's so much math!!  T-T  My head hurts.  I had to take so many measurements last night and I took more today.  If you ever read the first Harry Potter book, the scene where Harry's at Madame Malkins getting measured for his robes.... yeah like that.  I'm surprised I don't need to measure the length of my teeth or something with the way this book is going.  Anyway, here's a picture of the sketch I made, and what I hope to knit.  Now that I look at it, I'm thinking of making a Peter Pan collar instead of the V- Neck.... hmm.  Wouldn't it be awesome if I made a book of patterns O.o ?!
The Sketch

I think that's all for now, I've got a long and tedious day ahead of me with dentist visits and the continuing effort to clean my room.  Oh.  Joy. 

Do you feel the enthusiasm?  

See Ya'll Later!

Sunday, September 9, 2012

50... er, 4 Shades of Grey


So photos of the Whale.  This post will have them. 
The Whale as of 5 minutes ago

Today was amazing, I met up with Dory in NYC today.  She took me to the Garment District to find bead stores so that I could color match beads for the Whale project.  Now some of ya'll know that I have been working on this piece for almost a year now.  I started on November 13, 2011, and I took like 6-7 months off from the piece in order to complete some costumes for Otakon and Steampunk Worlds Fair.  Well I want to finish this piece ASAP.  One of the biggest challenges, besides the sheer amount of time it takes to sew down the beads, was that I was unable to find the correct shades of grey for the whale in the local bead shops.
E.L. James aint got nothin'
on my shades of grey 


  Ac Moore and Michaels craft stores have failed to offer more than one shade of grey, so I looked at specialty shops within a reasonable driving distance.  Well out of the four I looked up, only one was still in business, and they sold the grey tones I needed, but not in the quantities I needed to complete this piece.  The dimensions of this piece are 36x24 inches at least.  That's a whole lot of surface area to cover.  Sometimes I look at it and feel like I want to cry.  Now my brain (the one inside my head lol) is running ahead (lol) without me.  I've already prepped 3 more canvases in anticipation of continuing this series of work.  As I've been working on the Whale, I've been thinking about the deeper meanings in the project.  What makes this special to me, and the big question, why did I pick a whale when I've never seen one outside of an aquarium?  So this got me thinking about what the nature of what my art is, in regards to this subject matter.  Have I seen death?  And I came to the conclusion that, yes, I have seen death and it's almost a daily occurrence in the form of road kill.  I live in an area that's suburban, but it backs up onto wooded areas and some farmland.  Unfortunately people can't seem to figure out how to drive, so there's always dead deer, raccoons, squirrels and birds on the side of the road.  So I came to the conclusion that I should make art from what I see.  I see road kill every day, let's make art about it.  Not a terribly original concept, but this and trees are what I see everyday besides the inside of my house.  I looked into what happens to roadkill in NJ and found that most road kill is incinerated/ disposed of or left to rot on the side of the road.  It's not an honorable death and certainly not a pleasant one.  The exception for the rule is deer.  If the deer is freshly dead, there's a number of groups that are licensed to remove the carcass and if it's in good condition are allowed to give the meat to charities/ soup kitchens.  Of course health and safety rules are in place, but the flesh ends up not rotting on the side of the road and is put to good use, but only if someone reports it and it's hauled away within a certain time frame.  So now the art has become almost an effigy for the spirit of the dead animal.

On a lighter note, I'm learning the dainty art of tatting.  No I'm not tattooing people, tatting is a form of lace.

Look at my pretties
These are my samples. I'm very proud of them. This is not an easy process to learn, well, any lace process is not easy to learn. I haven't even begun to attempt bobbin lace, frankly it scares the bejebus out of me. I'm still learning techniques and it'll be a while before I'm making awesome stuff, like doilies.  My great grannies would be proud. 

That's about as much adventure as I can take for now,
See Ya'll Later
~Amy

Saturday, August 25, 2012

The Continuing Story of the Horns.

Well unfortunately I don't have any photos of the second phase of the horns... sorry guys I dropped the ball.

But I can give some detailed instructions.

First locate your cardboard horns.  Make sure all holes and hollows are plugged up with hot glue.  Some of the cardboard pieces are gonna have big dips in them and it's gonna make the next few steps that much harder if they are not filled in with hot glue trust me.
Next, find your reference images:  these images are what will determine the texture of your horns.  I chose to model my horns after a gazelles.
So now we need a medium.  This is what will cover the horns and allow for some sculpting to take place to give it texture. I used a two part clay called Apoxie.  Two part clays are a clay that has a part A and a part B and you mix them (in this case in equal parts).  If you can't get Apoxie, try another air dry light weight medium.  Paper clay, or paper mache is light weight, malleable and you can sand it.  Don't use standard air dry or terracotta clay since it's brittle and will not adhere very well.  Basically if you would make pots or tiles out of it or if it shatters when you drop it, don't use that clay!  Once you have your medium, spread a thin layer of your clay over the entire horn.  I worked in small sections to allow the clay to harden before moving on to the next spot.  I worked the Apoxie this way so that I would have a hand hold and be able to set the horn on a flat surface to dry without getting marks in the surface.  If you end up with rough patches I've found a basic clay tool (wood or plastic) with a flat, rounded head is good for smoothing out these textures or use a dab of water and rub your finger over the rough patch.  Apoxie has a dry time of about 24 hours according to the package.
When the pair is entirely covered in the primary surface of clay, sand it until it's smooth or the awkward textures you don't want are gone.  Sanding can also help shape the tips of the horns into a point if working with the wet medium fails to produce one.
This is where the reference image(s) are crucial because now any ridges or texture gets added to make the horns seem real.  The gazelle horns I modeled my pair after were smooth and shiny black with large, defined and rounded ridges.
This is the reference photo I used
(via bing search)
 This worked out really nicely for me since it meant I didn't need to make small, freakishly difficult textures on both horns.  After the sculpting was done I took a fine grade of sandpaper and gave the horns a once over to get rid of any unwanted rough patches etc. 
Once all of the sculpting is done, you need to prep your horns for painting.  I picked up a can of glossy black spray paint from Home Depot for like $11.  I chose not to use a primer paint like gesso since I was going to be painting it black.  If  you plan on painting your horns any other color besides black, it may benefit you to use a primer before painting to get an even under tone or a "blank canvas" effect.  After that the painting is all up to you.  I took a black plastic trash bag and split the side seams for a tarp to spray on top of.  It was cheaper than buying one and I could dispose of it after I finished.  Also always spray paint in a well ventilated area like outside and wear a mask.
Methods of attachment can range depending on what you're goals are.  I attached mine to a hat, and the horns were pretty heavy by the way.  I've used 2 tie pins in the past to hold pieces in place, this way I could remove them and exchange bits depending on what my costume goals were.  In this case, due to the weight of each horn, I bonded the horns to the sides of my hat via a combination of E6000 jewelers epoxy and hot glue.  This stuff ensures a strong hold but it takes away the interchangeability of your props.  
So here's what the hat and the horns looked like when I finished:

My lovely work space.
Hot right?  Well here's a picture via the lovely Jillian of the costume I wore it with:

Otakon 2012
I think I wore this for about 2-3 hours before I started to pass out from the heat.  It was over 100 degrees Fahrenheit for that convention and that skirt weighed a few pounds on it's own.  I was sweating my bum off. Oh yeah I totally sewed that skirt in like 5 days and used nearly 6 yards of fabric, but it looks awesome! 

Otakon, now there's a ...cluster fuck.... nah that's too harsh.  It was full of convention drama.  Although the highlight was probably the Cosplay Burlesque Workshop.  We got on line early so we'd get seats (when I say we I mean, Jillian, Mike, and others who I'm too lazy to name but are more than likely a part of the Red Horizon or Phoenix Airship.) and one of our group members shows up to join us on line.  Now, he's dressed as Jay from Jay and Silent Bob (I'll just refer to him as Jay), he walked around with an "Eat Pussy" sign and a boom box along with his friend who was Silent Bob.  So the boom box starts to play that song from Clerks 2, where they do a parody of the Buffalo Bill dance from Silence of the Lambs, and Mike starts to strip.  I'm not kidding you he started shedding layers of clothes.  I'm sure there's a video of it out there on the internet, I just can't seem to find it.  It was really funny though cause Mike had a lot of layers to shed.  There was his gloves, belt, harness, gun and holster, vest, shirt, pants and various other bits and pieces.  All this is happening with the music in the hallway waiting for the workshop to begin.  From the time we were waiting until the end of the workshop which was about 3 hours, Mike managed to strip to his skivvies 3 times.  The workshop was great and at the end, they had a strip-off.  3 guys from the audience got up and danced for our amusement.  The first guy wasn't all that amazing, and then there was a Spock cosplayer and he was just so freaking graceful.  He very nearly kissed one of our group who happened to be in the aisle seat and he was just great to watch.  Then it was Mike's turn.  Now you have to remember that it was over 100 degrees Fahrenheit that day so we had all been sweating like crazy.  So Mike starts stripping again and it's like watching some cheesy 70's porn with this goofy grin on his face.  Well he gets to his shirt, and he swings it around and throws it into the crowd of spectators, and this girl with a braid catches it and her face is priceless, cause that shirt was soaked through with sweat.  You can imagine the horror.  Well after regaining all of his bits (lol) Murder Nurse (one of the Cosplay Burlesque performers) asks Mike to apply for a position in the group.  As of right now Mike claims to be too busy for it, but I think he should apply anyway.  Could be fun right? 

Well I think that's all for now.  I'm sure more Otakon stories will leak out into my posts as I find them relevant or start rambling about them.  So, yeah.
Se Ya'll Later!
~Amy

Tuesday, June 12, 2012

Horns Of Destiny or, How to Make Your Own Horns Using Cardboard

Alright guys here it is.  The long anticipated first post on a pair of constructed horns.  Originally these were horns meant for the Lolita Loki Avengers costume.  The costume is still gonna happen, for NYCC in October, but I will not have it done for Otakon.  These are tester horns, I'm making these as a test of the method I've created.  That, and I made these the wrong shape to be Loki's horns... so Loki will have to wait.  Now all I've used is card board and a hot glue gun.  I love these materials.  I never realized how awesome card board is as a sculpting medium, and the hot glue was perfect for fast and easy gluing.  Normally you all have probably heard me go on about the E6000 glue and how awesome it is.  It still is really nice to have, but for a project like this, having a fast cool down/ dry time is essential. 


 So, firstly, get your materials!
Careful with that.
  I raided the recycling bin in the garage and pulled out this box. I used corrugated cardboard and I'll explain why later.  Then I got hot glue.  Any kind will work, I picked mine up from AC Moore.  The next step is to cut open the box so that it's spread out into one big piece, like so:
Spread that cardboard out
like it's Butter!
This is gonna allow you to gauge how much card board you're going to need. Make sure the pieces you cut are not interfering with the folds and bends of the box, otherwise your cardboard will bend in the direction of the fold. Next you're gonna want to cut the basic shape of your horns. 
So horny right now XP
Cut two of this basic shape.  Don't question me just do it.  These pieces will act as a 'spine' for the next few steps and will determine almost everything from this point onwards including the width of the pieces.  I've drawn lines in preparation for the next step, about every half inch or so.  As you can see they are the wrong shape for the Loki horns, but at least they'll look cool.  Now since I want these horns to be curved I need a strong supporting structure for any coverings that will come later and they will also need to be curved.  Basic shapes are our friend people.  We can't create anything without the sphere, cube, cylinder, and cone.  So because I'm building a 3D structure out of flat pieces, I need to cut shapes that are rounded yet flat.
Cut circles!
Cut circles that are the same diameter as the lines you should have drawn on the basic shape.  Draw the circles onto your spare cardboard.  Cut out the circles and then cut them in half.  Glue each half onto opposite sides of the basic horn shape following those lines you made.  Once you have that finished on both sides of each horn, the time has come to start covering the open spaces.
First prep your card board.  I told you there was a reason why I picked corrugated cardboard.  Lay a section of cardboard flat on the cutting surface.  Take an Exacto knife or other incredibly sharp slicing utensil and score the surface of the card board.  Corrugated cardboard is hollow, if you look at it from the edge you can see the top and bottom surface pieces, and then a third wobbly piece inside holding the two together.  You're going to slice through that first layer of card board in the dips of that third layer.  Do not cut all the way through the card board or you won't be able to shape it the way you need to.  What this step does is allow the card board to bend and flex freely while still being a solid piece.  Basically you'll be able to comfortably wrap the cardboard around a pencil without creases or struggling.  Score a few broad pieces of this in prep for the next few steps.  This is what your card board should look like: 
Please ignore the head.
Now that you have your cardboard prepped and ready to go, this is where it gets intuitive. I cut strips of the scored card board to match the spaces in between the half circles.  Now my circles are not evenly spaced, they were wider at one end and narrower at the other.  I had to cut my strips in an almost triangle shape.  You'll have to measure and cut each segment to fit perfectly over each space.  Once you've cut your piece, hot glue it down and try not to burn yourself.  Sorry I can't be much help on this step, but everybody is gonna have different measurements here and you're gonna have to work it until it looks right to you.  Your horns should start to look like this:
Inch by inch.
This step will take you hours so be prepared to stop and take breaks ever now and then, and please don't forget to take meals. As you lay down the pieces, plug up any and all holes with hot glue.  Trust me that will make the next set of instructions (the next post) easier.  Once you're done your horns should look like this:
My new Babies.
Congrats, you're at the halfway point to completing your own customized pair of cardboard horns. In the next post... or two... or three, I'll go over the process of making the horns textured and sculpted to look like they came off an animal or demon. Fun yes?  If there are any questions, comments or advice please leave a comment below, I'd be happy to hear from you and offer any insight I can if needed.
Until next time,
See Ya'll Later!
~Amy