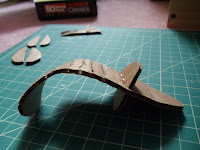
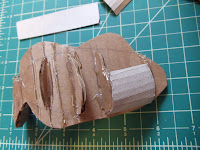
I've been meaning to make some gifts for my Christmas celebrating friends, and this year, I thought it would be nice to make ornaments. I decided to go with a theme that everyone can get behind, so I picked fish. Who doesn't love a cute clown fish like Nemo? This is an especially nice gift for friends with kids who want to make an assortment of under-sea creatures that are kid friendly and cheap to make. The basic concepts for the construction is the same as the Cardboard Horns I posted about back in the summer.
You will need:
One empty corrugated cardboard box
One empty tissue box or non-corrugated cardboard box of equal weight
One bottle of Elmers white glue (or any school-kid, clear drying glue that's not a gel or stick)
Crappy paint brushes
Brown craft paper or grocery paper bags (there's a reason for this, I'll get to it later)
Hot glue and hot glue gun
Strong scissors
Plastic bowl (for water)
Rags
Acrylic Gesso (primer)
Acrylic paints
Nicer set of paint brushes
Acrylic varnish (glossy)
An exacto knife
A cutting mat or cutting surface
You'll need materials first:
 |
| Corrugated Cardboard |
 |
| Tissue Box |
I chose a clown fish cause it's small and relatively easy to cut out it's shape from cardboard, plus it's just so cute. I was going to make an Angler fish, but figured if I want to give this to someone, a Clown fish would be less nightmare inducing. I google image searched for a clown fish and began by drawing the basic shape of the clown fish body. In this basic drawing, include the top two fins, the tail fin and the back bottom fin. Don't cut out the two little bottom fins at the front of the fish or the side fins on the body just yet. We're gonna leave those for later. Once you've drawn out the basic fish shape, cut it out from the cardboard.
 |
| Draw the basic shape |
Start giving a 3-D shape to the fish:
 |
| It's only mostly dead. |
Study pictures of the species of fish you want to make. Unlike the Horns, to make the structure of the body of the fish you can't use exact circles because that's not how a fish really looks. Find frontal and body views of the fish and study the shape of the body. For the clown fish, it's bigger and rounder at the bottom of it's body and it tapers off into the fins at the top. I marked off vertical lines (following the grooves) where I wanted support pieces to go for the body of the fish and measured them. I drew up tear-drop shapes that were the height of the fish's body for each one of the lines.
 |
| Brings a tear to my eye... |
Using the hot glue gun, hot glue the half tear-drop shapes to the body following your lines. make sure that you have lines on both sides of the body and that when you glue the pieces down, they line up right. Make sure you have enough supports to get a nice smooth transition from one end of the fish to the other.
 |
| I did not have enough supports T-T |
Cut a section of tissue box away from the rest and lay it flat on your cutting mat. I used this cardboard to cover the structure supports from above and give it a more even surface for the future steps.
 |
| Slice it good |
 | |
| Should start to look like this when you start... |
 |
| ... and when you finish. |
Sorry guys no photo of this step.
Take you're brown paper bag (the grocery bag) or brown craft paper and start tearing it into pieces about 1 inch square. Do Not Cut!! You must tear the paper. Tearing the paper allows for the paper fibers to be exposed and this will help blend your pieces together for a smoother finish. When you cut with scissors, the harsh edges don't blend together and you'll end up with ridges in awkward places that are hard to get rid of later. Once you have these pieces torn, take a few and tear them up further so that they fit on the pad of your pinky finger. I did this because the scale of the fish is so small, that to get the paper to lie flat over the curves, the pieces need to be smaller. It'll take a little longer to finish but the smoother texture to the fish will be well worth the patience. After your pieces are prepped, get a crappy brush, a scrap piece of cardboard and the Elmers glue. Pour some glue on the scrap card board, and with a crappy paint brush start painting patches of glue onto the fish. After laying down the glue, pick up a piece of your torn craft paper and place it down on the patch of glue, use the paint brush to give a coating of glue making sure to get all the edges down. Repeat this until the entire fish is covered in one layer of paper mache. Let this dry completely before moving on.
Fins:
Grab a piece of the tissue box and sketch out a pair of side fins and a pair of the bottom fins. Using the above process give one layer of paper mache to both sides of the fins. When they are dry, hot glue them into place according to how the fish looks. If you want fins that have folds or bends, score the cardboard appropriately and give a little bit of hot glue to keep the curves in place. Always reference back to your original images for placement!! Your fish shouldn't look like a Picasso! After you glue down the fins to the body of the fish, give them another coating of paper mache and the surrounding area where the fins are joined to the body. Allow this to dry.
At this point you can smooth out any lumps and bumps using wads of paper mache, apoxie or paper clay (you can pick that stuff up in most craft/ art supply stores). If you feel it's still not sturdy enough you can add more layers of paper mache, I only used 1 layer on the body and 2 layers on the fins and I found that to be fairly sturdy... just don't stand on it.
Allow this to dry completely.
Painting:
Use a clean crappy brush and apply gesso to the whole fish.
 |
| gesso... |
 |
| After gesso, I gave an red-iron-oxide base |
After you're done painting, give a few layers of glossy varnish to keep the colors safe from chipping and to give a wet-shiny look.
To make this an ornament add a ribbon and tie a bow at the top.
Always remember to clean and dry your brushes after using them and clean your space after you're done working.
... and you're done! Your fish should look something like this:
 |
| Like this! |
 |
| And this! |
So I hope you all found this helpful, and any questions leave a comment.
Happy Holidays!!
See ya'll later!!
~Amy
No comments:
Post a Comment