Tuesday, June 12, 2012

Horns Of Destiny or, How to Make Your Own Horns Using Cardboard

Alright guys here it is.  The long anticipated first post on a pair of constructed horns.  Originally these were horns meant for the Lolita Loki Avengers costume.  The costume is still gonna happen, for NYCC in October, but I will not have it done for Otakon.  These are tester horns, I'm making these as a test of the method I've created.  That, and I made these the wrong shape to be Loki's horns... so Loki will have to wait.  Now all I've used is card board and a hot glue gun.  I love these materials.  I never realized how awesome card board is as a sculpting medium, and the hot glue was perfect for fast and easy gluing.  Normally you all have probably heard me go on about the E6000 glue and how awesome it is.  It still is really nice to have, but for a project like this, having a fast cool down/ dry time is essential. 


 So, firstly, get your materials!
Careful with that.
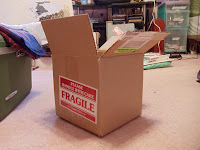
  I raided the recycling bin in the garage and pulled out this box. I used corrugated cardboard and I'll explain why later.  Then I got hot glue.  Any kind will work, I picked mine up from AC Moore.  The next step is to cut open the box so that it's spread out into one big piece, like so:
Spread that cardboard out
like it's Butter!
This is gonna allow you to gauge how much card board you're going to need. Make sure the pieces you cut are not interfering with the folds and bends of the box, otherwise your cardboard will bend in the direction of the fold. Next you're gonna want to cut the basic shape of your horns. 
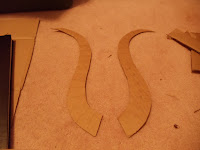
So horny right now XP
Cut two of this basic shape.  Don't question me just do it.  These pieces will act as a 'spine' for the next few steps and will determine almost everything from this point onwards including the width of the pieces.  I've drawn lines in preparation for the next step, about every half inch or so.  As you can see they are the wrong shape for the Loki horns, but at least they'll look cool.  Now since I want these horns to be curved I need a strong supporting structure for any coverings that will come later and they will also need to be curved.  Basic shapes are our friend people.  We can't create anything without the sphere, cube, cylinder, and cone.  So because I'm building a 3D structure out of flat pieces, I need to cut shapes that are rounded yet flat.
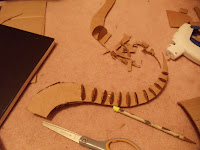
Cut circles!
Cut circles that are the same diameter as the lines you should have drawn on the basic shape.  Draw the circles onto your spare cardboard.  Cut out the circles and then cut them in half.  Glue each half onto opposite sides of the basic horn shape following those lines you made.  Once you have that finished on both sides of each horn, the time has come to start covering the open spaces.
First prep your card board.  I told you there was a reason why I picked corrugated cardboard.  Lay a section of cardboard flat on the cutting surface.  Take an Exacto knife or other incredibly sharp slicing utensil and score the surface of the card board.  Corrugated cardboard is hollow, if you look at it from the edge you can see the top and bottom surface pieces, and then a third wobbly piece inside holding the two together.  You're going to slice through that first layer of card board in the dips of that third layer.  Do not cut all the way through the card board or you won't be able to shape it the way you need to.  What this step does is allow the card board to bend and flex freely while still being a solid piece.  Basically you'll be able to comfortably wrap the cardboard around a pencil without creases or struggling.  Score a few broad pieces of this in prep for the next few steps.  This is what your card board should look like: 
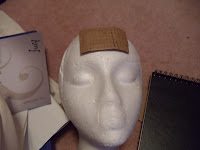
Please ignore the head.
Now that you have your cardboard prepped and ready to go, this is where it gets intuitive. I cut strips of the scored card board to match the spaces in between the half circles.  Now my circles are not evenly spaced, they were wider at one end and narrower at the other.  I had to cut my strips in an almost triangle shape.  You'll have to measure and cut each segment to fit perfectly over each space.  Once you've cut your piece, hot glue it down and try not to burn yourself.  Sorry I can't be much help on this step, but everybody is gonna have different measurements here and you're gonna have to work it until it looks right to you.  Your horns should start to look like this:
Inch by inch.
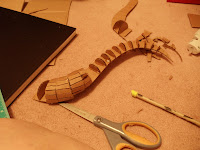
This step will take you hours so be prepared to stop and take breaks ever now and then, and please don't forget to take meals. As you lay down the pieces, plug up any and all holes with hot glue.  Trust me that will make the next set of instructions (the next post) easier.  Once you're done your horns should look like this:
My new Babies.
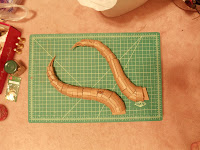
Congrats, you're at the halfway point to completing your own customized pair of cardboard horns. In the next post... or two... or three, I'll go over the process of making the horns textured and sculpted to look like they came off an animal or demon. Fun yes?  If there are any questions, comments or advice please leave a comment below, I'd be happy to hear from you and offer any insight I can if needed.
Until next time,
See Ya'll Later!
~Amy

Saturday, June 9, 2012

Never Thought I'd Use Sexy and Squid in the Same Post

O man guys.  This weekend.  Crazy.

To begin with: Dorian's Parlor: The Promised Picture.  So I have a total of 2 photos from Dorian's Parlor.  I was busy having fun so sorry guys.  But I do have a photo of the ever lovely Jillian: 
Va.  Va.  Voom.
We forced her into a corset by Mayfaire Moon Corsets and god damn the girl is tiny.  Jillian looked really great the entire night and with Neil and Jillian's friend (whose name I have forgotten (sorry)) accompanying us, we had a great time.

Then there was AnimeNext on Friday.  I helped out Dory with running her table.  She had a ridiculously small space, only 3 feet of table and tons of stock.  These kids are crazy.  I don't remember being that hyper and jumpy when I was 16 years old.  I got my swag though.  I collect pins/ buttons, so every convention I go to I try to grab A) as much free stuff as I can and B) pick up some great pins with awesome art or characters I like.  My favorite from AnimeNext would be from Etsy seller ZombieRomance.  She had some really great art work, pins and earrings.  I love the earrings I picked up from her.  She was super nice too, while we were getting ready to leave for the day and packing up I suddenly remembered I wanted to grab a pair of earrings from her, and she pulled out her earring stand to let me pick out what I wanted.  I picked these:

Squid!!  They Dance the Dance of Life!
I love these earrings. I wanna wear them to work tomorrow. The girls at work already think I'm out of my freaking mind, so why not squid myself out and make it official?  After leaving the convention, we went back to Dory's place and helped her get ready for the next day.  Dory's got some amazing bows at the conventions, I wish she'd update her website more often so everyone could see the awesomeness!!

Then today was an adventure into the bowels of P.A.  I met up with some crew members from The Red Horizon / Phoenix Airship group.  We went out to the Quaker flea market, which was surprisingly small.  We got there after 9am and there was a forecast of rain so most sellers either didn't show up or were packing up early.  I found some great swag despite the lack of turn out, I'll post some pictures when I get the pieces cleaned off and/or repaired.  I wish I could make some sort of a living off of hunting flea markets.  I find some really great stuff that most people pass by.  I totally found a brass spyglass that the other 3 people I was with passed by.  Shiny things catch my eye and distract me.

Alert!!  Strongly Suggested For the Ladies only! -->
So as most people can tell you, I'm a fan of DC/Marvel comics and movies.  And as these same people can tell you, I'm a big Loki fan.  Tom Hiddleston is my Hollywood Heart Throb now.  So sexy.  So to feed this never-going-to-go-anywhere crush, someone on facebook sent me this video... well more like an audio clip.


Now just close your eyes and listen to the sound of his voice and I dare you to tell me this isn't Sexy.  As.  Hell.

So I think that's about it for now, there will be project update posts soon I swear.  I just want to get a few things done first before I sit down and write out an in-depth post... with pictures.  I have been documenting these projects closely so fear not those of you who are too lazy to read.

See Ya'll Later! 

Tuesday, June 5, 2012

Steamy Goodness

Wow I need to take more pictures.  I've been neglecting this blog in favor of jobs and working on costume bits and art.  new projects on the horizon, new friends and awesome road trips have and will ensue.  For starters Steampunk Worlds Fair was incredible.  Marina aka The Crazy Kimono Lady, had an incredible panel featuring 3 lovely models, one of which was me. 
Crazy Kimono Lady (in white) and her Wenches.
(I'm in green) 

That panel room was too small and there was no ventilation at all. Marina nearly passed out from the heat and all of us were sweating in the multiple layers involved in wearing kimono.  Marina is incredibly knowledgeable in kimono and has practiced dressing others and herself in various styles and period pieces.  I was demonstrating the full traditional way to wear a kimono which means that before the panel started Marina had to get me dressed in the undergarments.  That was awkward to walk around in and the sandals were too big for my feet.  Then the outer layer was put on, various cords ties and even a pillow were strapped onto me and I stood there and took it all like a mannequin.  Vered (in the blue corset) was demonstrating the correct way to wear a Victorian influenced under bust corset with a kimono and not split the seams.  The last Wench (I don't know her name) was demonstrating a more western way of combining a kimono with a steampunk outfit.  There was a more advanced panel the day after for the hard core kimono enthusiasts and I encourage anyone curious to seek out the Crazy Kimono Lady for all your kimono and Japanese culture needs. 
I really wish my camera hadn't died that day, because there were so many incredible costumes.  There were two guys on stilts walking around, several people had mechanical arms and the vendors were all selling out of their hotel rooms as is the norm for these events.
At night there was a jam session outside in the parking lot with lots of awesome people, cookie cake and booze!  This is where I met Mike.  Mike is the Captain of the Red Horizon Steampunk Airship and is a costume prop maker like me.  He works with metal and shop materials.  I have yet to see any of his works just yet but we're trying to collaborate on a few props. 
Then there was Clover Con out in the middle of nowhere Bridgewater, NJ.  Literally I've never been to a convention quite so small, hot and in a 4-H center.  I'm not kidding.  I was helping Dory run her table in the "Artist Alley" which was really a table next to the bathroom in a gymnasium.  The ages of these kids was also incredibly young.  I think Dory and I were some of the oldest people there who weren't parents accompanying minors.  But the highlight of that day was getting my hands on The Doctor. 
>:3
There was a 10th Doctor cosplayer from Doctor Who there and he looks eerily like David Tennant.  Which was good.  Very Good.  His pocket ripped and I was able to stitch it back into place temporarily.  So yummy.  Anyway............  What was I saying?  Oh right, seeing him totally made my day.

So I've been wanting to make an anthropomorphic Steampunk costume for over a year now, but could never really figure out how to make some of the organic parts without buying them from some shady dealers or getting them at ridiculously high prices.  Now, I have a method to make some of these things, and I'll  be writing a post about it when I've gotten further along in the project.  I know I'm being vague but I want the new projects to be a surprise!  Now I'm debating about shelling out a ton of money to get custom made fangs to go with one of the ideas.  I'm a big believer on spending money on shoes and teeth.  Seriously, if you wear crappy shoes, (even if they're $200 designer shoes) you can mess up your feet.  And if you mess up your feet you can screw up your spine for life.  I wear Clarks almost everywhere cause they have amazing support and style.  In regards to teeth, I'm constantly having anxiety dreams about my teeth falling out of my mouth.  The weirdest one was a nightmare where my teeth turned dark purple and proceeded to crumble to dust in my mouth.  I woke up and ran to the bathroom to brush my teeth and swish some Listerine around.  Dental work is important.  So if I'm gonna get any caps or fake teeth, I'm gonna make sure they don't screw up my teeth anymore then they already are.  Even if that means shelling out close to one hundred dollars for custom fangs.  It'll be cheaper than five hundred dollars worth of dental repair work that would be needed after fucking up my teeth. 
I think that's all for the time being.  I'm really tired and I need to wrestle the images from Dorian's Parlor off of my camera.... all 3 of them. 
See Ya'll Later! 
~Amy